


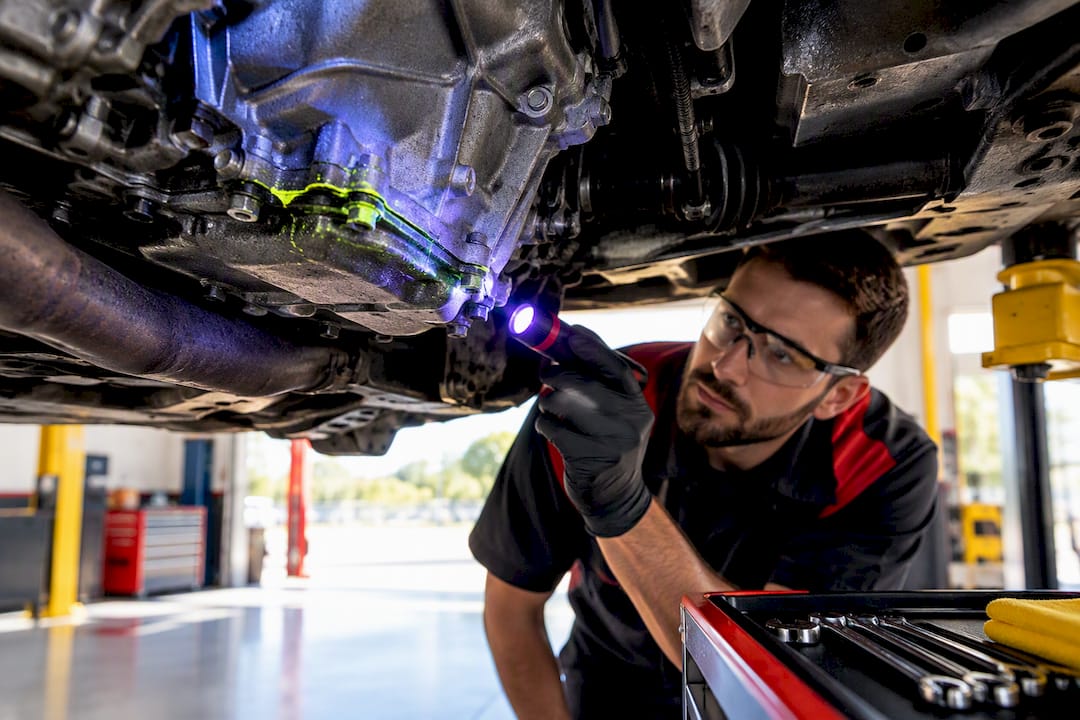
A rear main seal leak shows up as oil pooling near the transmission bell housing, right where the engine meets the transmission. If you see fresh oil in that spot with no other obvious source nearby, that’s a strong sign. Don’t jump straight to a full teardown. Have a shop confirm it with a dye test first, and keep an eye on your oil level in the meantime.
TL;DR:
- Confirm the leak source with dye testing before considering transmission removal, as many leaks resemble other component issues and can be misdiagnosed.
- Using stop-leak additives might slow a hardened seal leak but won’t fix tears or seals damaged by excessive crankshaft wear or improper installation.
- A slow rear main seal leak can be managed temporarily with frequent oil level checks, but driving with rapid oil loss or warning lights poses significant engine damage risks.
- Proper diagnostics include cleaning the area, applying UV dye, checking crankshaft endplay, and inspecting the PCV system to ensure correct repair and avoid unnecessary expense.
Table of Contents
- What Are the Symptoms of a Rear Main Seal Leak?
- Why Do Rear Main Seals Fail?
- How Do Mechanics Diagnose a Rear Main Seal Leak?
- What Does It Cost to Fix a Rear Main Seal Leak?
- Can You Drive With a Rear Main Seal Leak?
- What a Trustworthy Shop Does to Diagnose and Fix This Right
- Our Take: Confirm Before You Commit
- Get Your Leak Diagnosed the Right Way at Kwik Kar of Celina
- Sources
- FAQ
What Are the Symptoms of a Rear Main Seal Leak?
The classic sign is oil seeping from the area where the engine bolts to the transmission, often visible on the bell housing itself or dripping onto the top of the transmission case. Because this leak sits at the very back of the engine, oil frequently mimics leaks from other components. A rear main seal leak commonly shows up right at that transmission junction, and several nearby parts, like the rear valve cover gasket or a leaking oil pressure sensor, can drip into the exact same spot and confuse a visual check.
A few observation habits help narrow things down before you spend a dime on diagnosis:
- Check for oil after the car has sat overnight. Rear main seal leaks tend to show fresh drips at cold start, then seem to “slow down” once the engine warms and metal expands slightly.
- Wipe the area clean and drive 50 to 100 miles, then look again. A rear main seal leak reappears at the same spot; an oil pan gasket or drain plug leak usually traces lower and farther forward.
- Watch your dipstick weekly if you already suspect a leak. Losing more than half a quart between oil changes is worth investigating right away.
- Look at dirt and grime patterns. Oil mixed with road dust tends to build a thick, dark crust directly below a persistent leak point.
Why Do Rear Main Seals Fail?
Rear main seals are rubber or silicone components, and like any gasket material, they harden and shrink with age and heat exposure. That’s the baseline cause. But most premature failures trace back to something else going on in the engine that stresses the seal beyond what it’s built to handle.
A clogged or failing PCV valve is one of the more common culprits. When the positive crankcase ventilation system can’t vent properly, pressure builds inside the crankcase and forces the seal lip to “balloon” outward, which lets oil past even when the seal material itself is otherwise fine. Turbocharged and supercharged engines see this more often because they generate more blow-by gas.
Other frequent causes include:
- Worn crankshaft surface where the seal rides, often from age or a previous seal that wasn’t lubricated properly during installation.
- Excessive crankshaft endplay, which lets the shaft shift back and forth and chews up the seal lip unevenly.
- A rear main seal gasket installed incorrectly during a prior repair, such as a clutch job that required pulling the transmission.
- Consistently overfilled oil or the wrong oil grade, both of which raise internal pressure and accelerate wear.
How Do Mechanics Diagnose a Rear Main Seal Leak?
Confirming the source before you pay for labor is the single most useful thing you can do here. A rushed visual guess leads to plenty of unnecessary transmission removals, and that’s an expensive mistake to make twice.
- Clean the area completely. A technician degreases the bell housing, oil pan rail, and surrounding components so any new leak is easy to spot.
- Apply UV dye to the oil. The vehicle runs long enough to circulate the dye, then a black light reveals exactly where oil is escaping.
- Recheck after a drive cycle. A careful cleaning and dye test is a low-cost diagnostic step that often saves a customer from paying for teardown work they didn’t need.
- Test the PCV system and crankcase pressure. If the PCV valve is stuck or the hose is collapsed, that gets addressed before anyone touches the seal itself.
- Measure crankshaft endplay and flywheel runout. These specs matter because a seal replaced on a crankshaft with excessive play or a warped flywheel mounting surface will fail again, often within months. Diagnostic training programs list measuring endplay and checking flywheel and mating-surface alignment as standard steps for this exact reason.
Disassembly only becomes necessary once dye testing and pressure checks point squarely at the seal itself, ruling out the oil pan gasket, valve cover, or a leaking sensor.
Pro Tip: Ask your shop to show you the UV dye result before authorizing any repair. A legitimate rear main seal leak glows clearly at the bell housing seam. If the glow is somewhere else, you just avoided paying for the wrong fix.
What Does It Cost to Fix a Rear Main Seal Leak?
Your options split into two very different categories, and picking the right one depends on how far the seal has already deteriorated.
Seal conditioners and stop-leak additives work by softening and swelling old, hardened seal material so it seats better against the crankshaft. These products can slow or stop a leak caused by a hardened seal, but they won’t repair a torn or physically damaged seal. They typically need 100 to 200 miles of driving to circulate and take full effect, so patience matters more than a second bottle.
Full replacement is the only permanent fix once a seal is torn, or once endplay or crankshaft wear is driving the leak. Here’s what makes this repair pricier than most gasket jobs:
- Labor dominates the bill. Parts for a rear main seal cost relatively little; accessing it is what takes time.
- Transmission removal is usually required. On most rear-wheel-drive and many front-wheel-drive layouts, the transmission has to come out to reach the seal.
- Flywheel or flexplate work adds time. Technicians often resurface or replace this component while everything is already apart.
- Crankshaft machining is rare but possible. If the seal surface is grooved or worn, additional work is needed to restore a clean sealing surface.
Replacement labor commonly runs several hundred to over a thousand dollars depending on your vehicle’s layout, whether it’s manual or automatic, and whether extra parts or machining are needed.
Some shops pair this job with clutch replacement or other transmission work already in progress, since labor is the dominant cost either way and combining jobs avoids paying for the same teardown twice.
Can You Drive With a Rear Main Seal Leak?
A slow rear main seal leak usually won’t strand you today, but it deserves attention faster than most people give it. Here’s how to handle the interim safely.
- Check your oil level with the dipstick every few days, not just at the next scheduled oil change.
- Keep the area clean and note how quickly new oil reappears; that pace tells you how urgent the repair really is.
- A stop-leak product is a reasonable short-term bridge if the seal is hardened rather than torn, but treat it as a delay, not a cure.
- Avoid long highway trips if you’re losing more than a quart every few hundred miles.
- Have the vehicle towed rather than driven if you see the oil pressure warning light or notice rapid, visible oil loss. Running an engine low on oil risks bearing damage that costs far more than the seal itself.
Regular oil changes, using the correct oil grade for your engine, and keeping the PCV system in good shape all reduce your odds of a repeat leak down the road.
What a Trustworthy Shop Does to Diagnose and Fix This Right
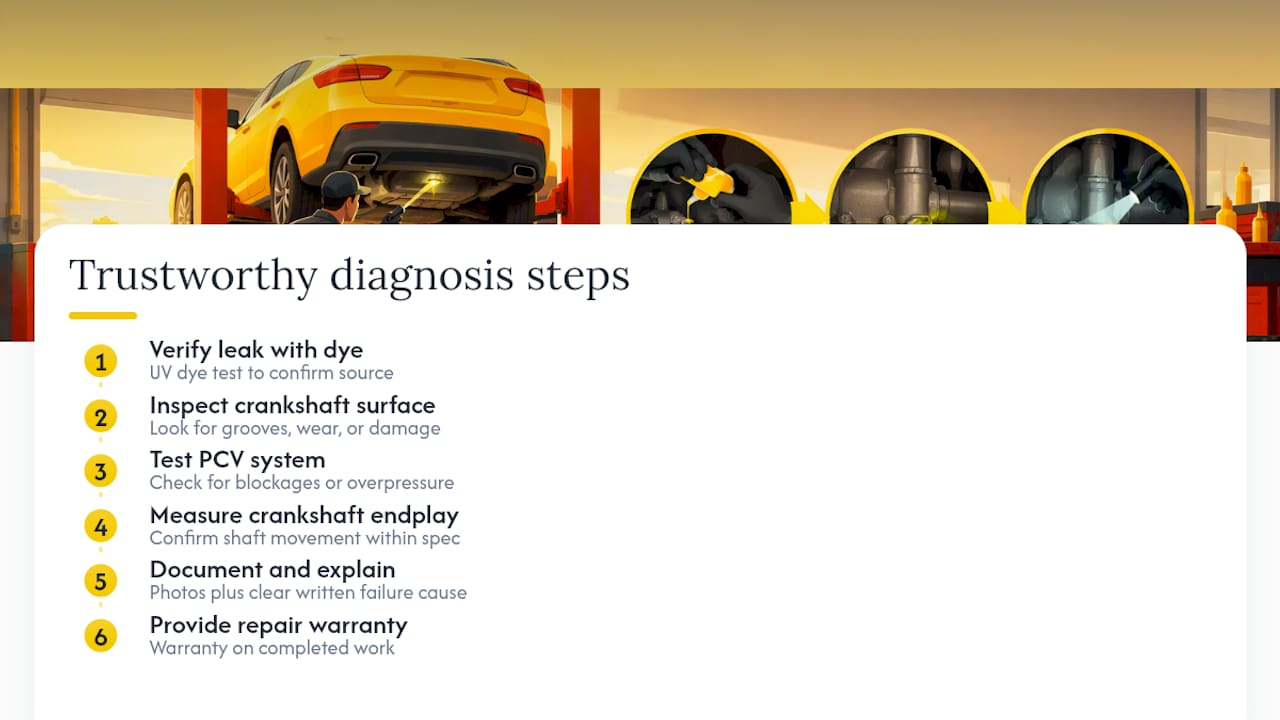
A shop worth trusting with this repair verifies the source with dye testing, inspects the crankshaft surface, tests the PCV system, and measures endplay before recommending replacement. Photo documentation of findings, a clear written explanation of what failed and why, and a warranty on the completed work all separate a careful diagnosis from a guess. If a shop wants to replace the seal without ever explaining what caused it to fail in the first place, get a second opinion before you approve the job.
Our Take: Confirm Before You Commit
The biggest mistake we see with this repair isn’t a bad seal. It’s skipping the diagnostic step and jumping straight to a quote. Plenty of leaks that look like a rear main seal turn out to be a valve cover gasket or a failing oil pressure sensor sitting an inch away, and those repairs cost a fraction of what transmission removal runs.
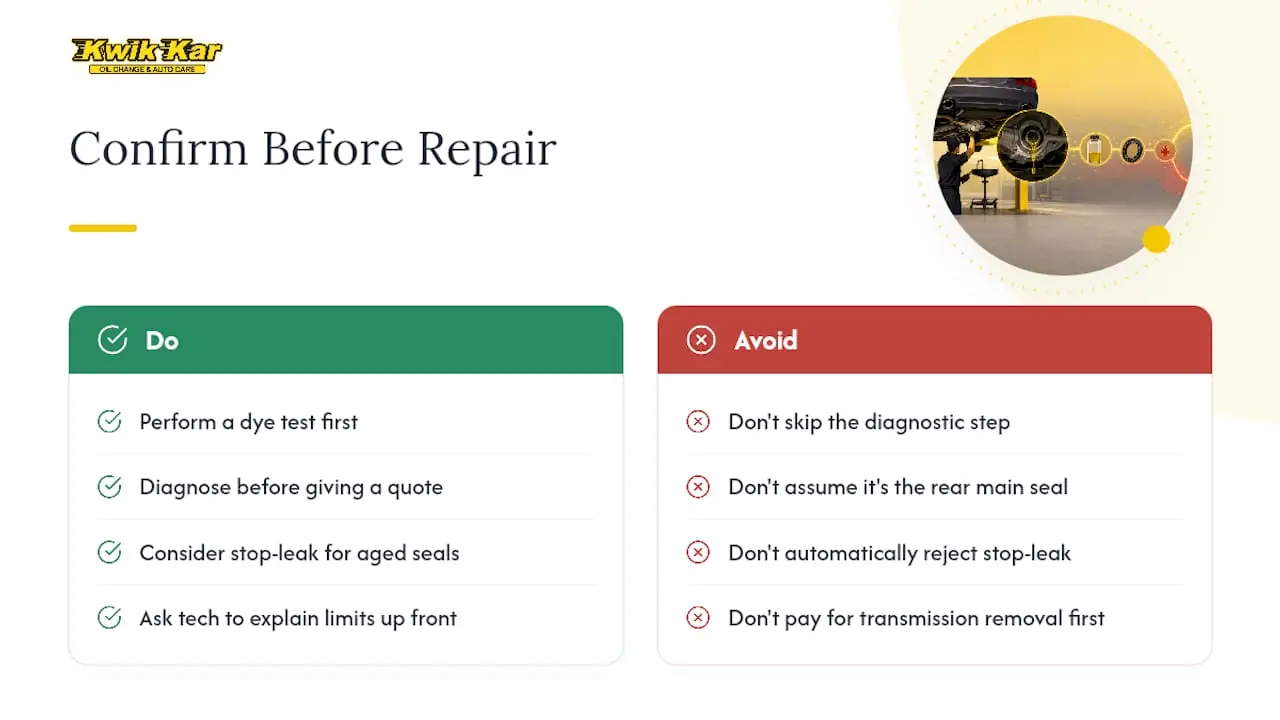
The second mistake is treating stop-leak as a scam or a miracle cure. It’s neither. It works reasonably well on a hardened, aging seal that hasn’t torn yet, and it buys real time. It does nothing for a seal that’s physically damaged, and a technician who tells you that upfront is being straight with you, not upselling you.
What we’d prioritize first, every time, is a proper dye test before any wrench touches the transmission. It costs little, takes an afternoon, and it’s the difference between paying for the right repair once and paying for a guess twice.
— Kwik Kar
Get Your Leak Diagnosed the Right Way at Kwik Kar of Celina
Kwik Kar of Celina runs every suspected rear main seal leak through a proper diagnostic process before recommending a repair, using digital vehicle inspections so you can see exactly where the oil is coming from, with photos, not just a verbal guess.
Our ASE-certified technicians handle everything from the initial dye test to full engine and transmission work when removal is required, and every completed repair is backed by our 2 year/24,000 mile warranty. Convenient options like after-hours drop-off and ride services can help manage repair time.
Bring us your vehicle’s mileage, a description of where and when you’re seeing oil, and your recent oil-change history. Book a diagnostic appointment through our services page and let us tell you exactly what’s leaking before you pay to fix anything.
Sources
FAQ
Is It Worth Fixing a Rear Main Seal Leak?
Yes, in most cases, especially once the leak is confirmed rather than assumed. Letting a confirmed leak go unaddressed risks running the engine low on oil, which can cause far more expensive bearing damage than the seal repair itself.
How Much Does It Cost to Fix a Rear Main Seal Leak?
Replacement labor typically runs several hundred to over a thousand dollars, depending on your vehicle’s layout and whether the transmission has to come out. Stop-leak additives cost far less and can help with a hardened seal, though they won’t fix a torn one.
Can I Still Drive With a Rear Main Seal Leak?
You can usually drive short distances with a slow leak, but you need to check your oil level frequently and top it off as needed. Head straight to a shop or have the car towed if you see the oil pressure warning light or notice rapid oil loss.
Can You Replace a Rear Main Seal Without Removing the Transmission?
On most vehicles, no, the transmission has to come out to access the seal, which is why labor drives the bulk of the cost. A small number of engine layouts allow limited access without full transmission removal, but this depends entirely on the specific vehicle and is the exception rather than the rule.